
New in Photoshop 2025: Remove Distracting People from Photos
This tutorial shows you how to instantly remove unwanted people in the background from your photo using the Remove Tool's new Find Distractions feature and generative AI in Photoshop 2025.
Download the PDF: 2025 - Remove Distracting People from Photos
The Remove Tool has received some big upgrades in Photoshop 2025. The main upgrade, which I covered in a previous tutorial, is that the Remove Tool now uses generative AI, powered by Adobe Firefly, to remove unwanted elements from your photos and replace them with new AI-generated content.
But along with generative AI, the Remove Tool also has a new Find Distractions option.
Find Distractions can be used to instantly remove two specific kinds of distractions from your photos. One kind (the one we’ll look at in this tutorial) is unwanted people in the background. Photoshop will detect your main subject and keep them safe while removing unwanted strangers and annoying photo bombers from the image.
The Remove Tool can also now instantly remove wires and cables. I’ll cover that in a separate tutorial.
Which Photoshop version do I need?
You'll need Photoshop 2025, released in October 2024, to use the Remove Tool's new Find Distractions and generative AI features.
Let's get started!
Step 1: Open your image in Photoshop
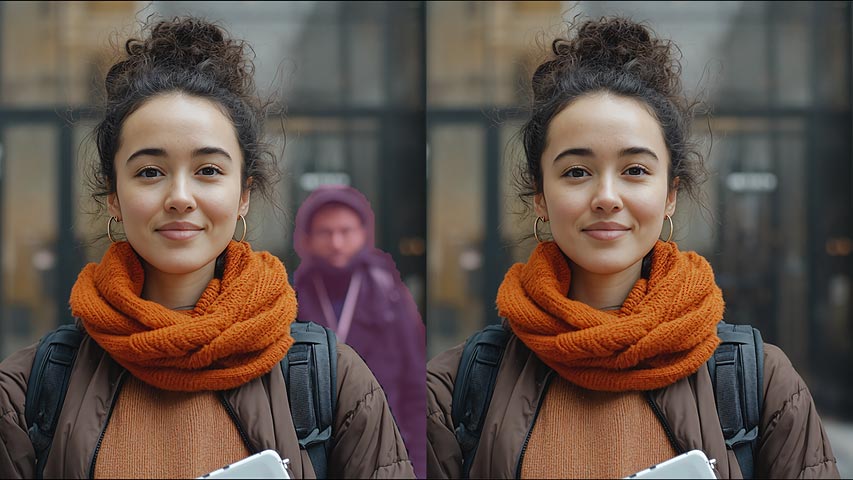
Start by opening your image in Photoshop. With my image, we have the woman in the center as the main subject, along with a distracting person behind her and another distracting person on either side.
As we’ll see, Find Distractions will not remove our main subject. It will only detect and remove the distractions.

Step 2: Add a new blank layer above your image
To keep the original image safe and work non-destructively, add a new blank layer above your image. We’ll do the removal work on the new layer.
In the Layers panel, click the Add New Layer icon at the bottom.
Photoshop adds a new layer named Layer 1
above the image on the Background layer.

Step 3: Select the Remove Tool
In the toolbar, select the Remove Tool.
By default, it’s nested behind the Spot Healing Brush so you may need to click and hold on the Spot Healing Brush icon and choose the Remove Tool from the list.

Step 4: Turn generative AI on
With the Remove Tool selected, go up to the Options Bar and set the Mode option to Generative AI on, just to make sure that the Remove Tool will use Adobe Firefly to replace the unwanted people with new AI-generated content.

Step 5: Turn on Sample all layers
Also in the Options Bar, make sure Sample all layers is checked so we can work on the blank layer we added earlier.
Don’t worry about the Remove after each stroke option next to it because it will be disabled when we select the Find Distractions option, as we’ll do next.

Step 6: Click on Find Distractions and choose People
Still in the Options Bar, click the new Find distractions button. Then choose People from the menu.
Notice that above People
, it says Editable
. That’s because after the Remove Tool selects the unwanted people, Photoshop will give us a chance to edit the selection before accepting it.

Photoshop takes a moment to analyze the image looking for people to remove. Then it highlights those people in magenta.
Notice that it did not select the main subject. Wth my image, only the person behind the woman, as well as the person on either side of her, were highlighted.

Step 7: Inspect and edit the selection if needed
Before removing the people, take a moment to inspect the selection(s) looking for areas that Photoshop missed.
For example, I can see that Photoshop missed quite a few spots along the edges of the woman’s jacket and the strap for her backpack. I know they were missed because they are not highlighted in magenta.

To add those missing areas to the selection, all I need to do is paint with the Remove Tool along those edges. You can adjust the size of the Remove Tool’s brush from your keyboard using the left and right bracket keys ( [ and ] ).
There’s no need to be overly precise when painting with the Remove Tool. In fact, you want to be a bit messy and include some of the surrounding area as well so Photoshop can do a better job at blending the new AI-generated content with the surrounding content.

Step 8: Click the checkmark to remove the people
With the selection cleaned up, click the check mark in the Options Bar to accept it.

Since the Remove Tool is using generative AI, Photoshop needs to connect to the Adobe Firefly servers over your internet connection, which can take a few seconds. You’ll see a progress bar while you wait.
When it’s done, the selected people are instantly removed and replaced with new image detail generated by Adobe Firefly. Your main subject is still there, but the distractions are gone.

Back in the Layers panel, you can toggle the people on and off to compare the before and after
results by clicking the eyeball icon for Layer 1.

And there we have it! That’s how to easily remove unwanted people from your photos using the Remove Tool’s new Find Distractions option in Photoshop 2025.
Learn how to use Find Distractions to remove wires and cables from your photo in the next tutorial.
Related tutorials:
- Using generative AI with the Remove Tool in Photoshop
- Using Generate Background AI in Photoshop
- How to generate entire images in Photoshop
- Extend an image with Generative Fill
- Use Generative Fill to turn photos to paintings
Don't forget, all of my Photoshop tutorials are now available to download as PDFs!