
How to Make Complex Selections Instantly in Photoshop
Learn how to make impossibly complex selections with a single click using the upgraded Select Subject and Remove Background commands in the latest Photoshop beta!

Download the PDF: Make Complex Selections Instantly in Photoshop (beta)
One of the more challenging things to do in Photoshop is make a good selection of a complex subject, where there are lots of small or fine details that need to be included. Depending on the subject and the background, making that selection can feel like an impossible task.
But thanks to an incredible new upgrade in the latest Photoshop beta, the days of making those impossible selections ourselves may soon be in the past.
The upgrade is to the Select Subject and Remove Background commands. They've both been around in Photoshop for years but they were never all that impressive. That is, until now.
Clearly Adobe has figured something out because in the latest Photoshop beta, those unimpressive commands are now two of Photoshop's most amazing features, capable of selecting virtually any complex subject with just a single click!
In this tutorial, I’ll show you how to use Select Subject and Remove Background to get the best results, and we’ll look at how much better they are in the latest Photoshop beta compared to the official Photoshop release. I’ll also explain the difference between Select Subject and Remove Background so you’ll know which one you should use.
Let's get started!
Which Photoshop version do I need?
At the moment, the upgraded Select Subject and Remove Background commands are only available in the latest Photoshop beta.
But the Photoshop beta is included with your Creative Cloud subscription and can be installed using the Creatvive Cloud Desktop app.
Running Select Subject and Remove Background on the cloud
Even with the Photoshop beta installed, there’s one more thing we need to do to use this new upgrade. We need to tell Photoshop to run Select Subject and Remove Background on the cloud rather than on your computer, because this new upgrade is only available on the cloud. We do that in Photoshop’s Preferences.
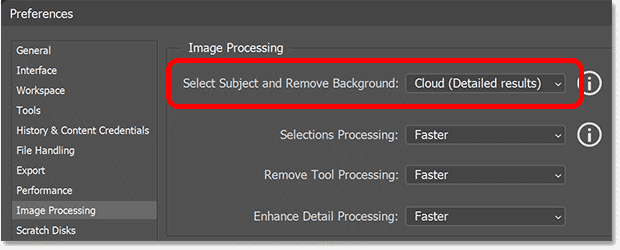
In Photoshop, on a Windows PC, go up to the Edit menu in the Menu Bar and choose Preferences. On a Mac, go up to the Photoshop menu and choose Settings.
Then from there, choose Image Processing.

In the dialog box, look for the option that says Select Subject and Remove Background and make sure it’s set to Cloud, not Device. Then click OK to close the dialog box.
You’ll also need your computer to be connected to the internet so Photoshop can talk to the Adobe servers.
How to use Select Subject and Remove Background
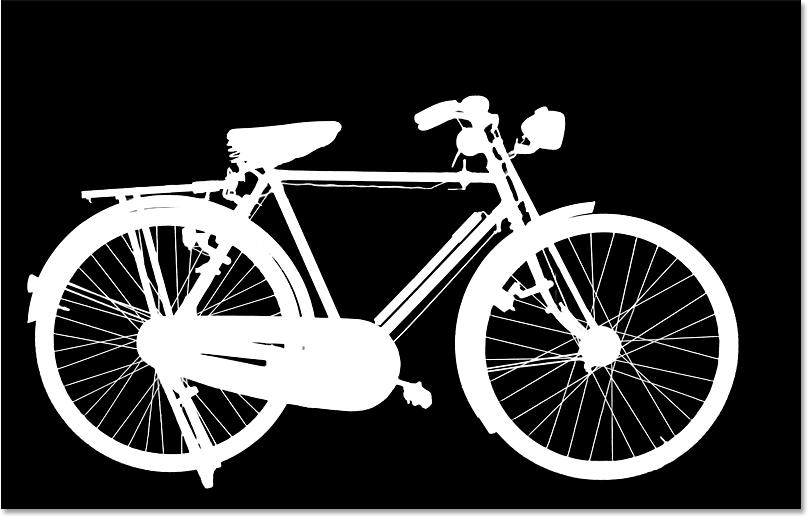
I'll start with this image of a bike. The reason is that a bike would normally be too challenging for Photoshop to select automatically. It just has too many small parts, especially those thin narrow spokes in the wheels.
So let's see what the Select Subject and Remove Background commands in the Photoshop beta can do.

With your image open, the Select Subject and Remove Background options are both found in the Contextual Task Bar, which should appear along the bottom of your image.

If you’re not seeing the task bar, right-click anywhere in the gray pasteboard area surrounding your image and choose Show Contextual Task Bar from the menu.

What’s the difference between Select Subject and Remove Background?
Select Subject and Remove Background are actually the same command. They both create the exact same selection of your subject.
The only difference is that Select Subject creates the selection outline and that’s it, so you can decide what you want to do with it.
Remove Background, on the other hand, creates the same selection of your subject but then goes a step further and removes the background. It does that by turning the selection into a layer mask. We’ll look at how that works in a moment.
Using Select Subject
In the task bar, I’ll start by clicking Select Subject.

A progress bar appears telling us that the selection is being processed on the cloud.

Then after a few seconds, we get our selection outline. And right away, things are looking much better than they ever did before.
Usually it’s hard to tell what’s actually selected and what’s not just by looking at the marching ants
selection outline. But in this case, it sure looks like every detail of that bike was selected, right down to each individual spoke in the wheels.

Now because I chose Select Subject, all I got was the selection outline. The background is still there. And that would be what you want if you just want to make an edit to your subject. Or you could invert the selection and do something to the background, like convert it to black and white.
In a moment, we’ll compare this result to what we get using the official Photoshop release so you can see just how much of an improvement this is.
But for now, I’m going to clear the selection by clicking Deselect in the task bar, so we can try the Remove Background command.

Using Remove Background
This time I’ll click Remove Background in the task bar.

As I mentioned, Remove Background will give us the exact same selection of our subject but it will then go further and remove our subject from the background.
And this is one of the most impressive things I’ve seen from Photoshop in a long time. Somehow it was able to recognize every detail of that bike, or at least 99 percent of it, while completely removing the background.
Again we’re going to look at what we get from the official Photoshop release in a moment.

How Remove Background works
I mentioned that Photoshop removes the background by turning the selection outline into a layer mask, and we can see that in the Layers panel.
We now have a layer mask thumbnail on the image layer showing, very clearly, the bike filled with white. And white on a layer mask is where the content of the layer is still visible.
The rest of the mask around the bike is filled with black, and black on a mask is where the content is hidden. So the background is actually still there. It’s just hidden from view.

You can turn the layer mask off to bring the entire image back by holding the Shift key on your keyboard and clicking the layer mask thumbnail. A red X appears in the mask thumbnail telling you that the mask is turned off, and the background reappears.
To turn the layer mask back on and hide the background, again hold Shift on your keyboard and click the layer mask thumbnail.

How to view the layer mask
To really see how well Photoshop selected your subject, you can view the layer mask in the document by holding the Alt key (Windows) or the Option key (Mac) on your keyboard and clicking the layer mask thumbnail in the Layers panel.

With the mask visible, we can clearly see the detail in the selection.
Is it perfect? Not quite. There are a few little spots here and there that need to be touched up. But this mask is so detailed that it looks almost exactly like the bike.
To hide the layer mask and return to the image, again hold the Alt or Option key on your keyboard and click the layer mask thumbnail in the Layers panel.
Comparing the Photoshop beta to Photoshop
We’ve seen the amazing job that Select Subject and Remove Background were able to do with the bike in the Photoshop beta. But how do those results compare to the official Photoshop release?
Well, here’s the result I got using Remove Background in Photoshop (the official version). Remember that it does not yet have the same upgrade.
In the official release, the selection of the bike looks terrible. Most of the spokes in the wheels are missing. Other areas are also either missing or were only partially selected, and we see lots of blotchy areas where the background is still visible.

Compare that to the Photoshop beta result where almost every detail of the bike was selected and the background is completely gone.

Looking at the layer mask, again the difference between the Photoshop beta result and the official release is night and day. The official release gave us this blotchy mess.

While the Photoshop beta and its new upgrade gave us a mask that looks nearly identical to the bike itself.

How does the Photoshop beta do with selecting hair?
So the bike was a great example of a subject that was too challenging for Select Subject or Remove Background in the official Photoshop release but can now be selected easily in the Photoshop beta. But of course, you may never have a need to select a bike, so let’s try something more practical.
In this image, I wanted to see if the Photoshop beta was better than the official Photoshop release at selecting the young woman's hair.

In both versions of Photoshop, I used Remove Background to remove the young woman from her surroundings. Then to make the hair selections easier to see, I placed her in front of a solid black background.
Here’s the result from the official Photoshop release.
It’s not terrible but her hair does look thin and brittle in places where Photoshop had trouble separating it from the background.
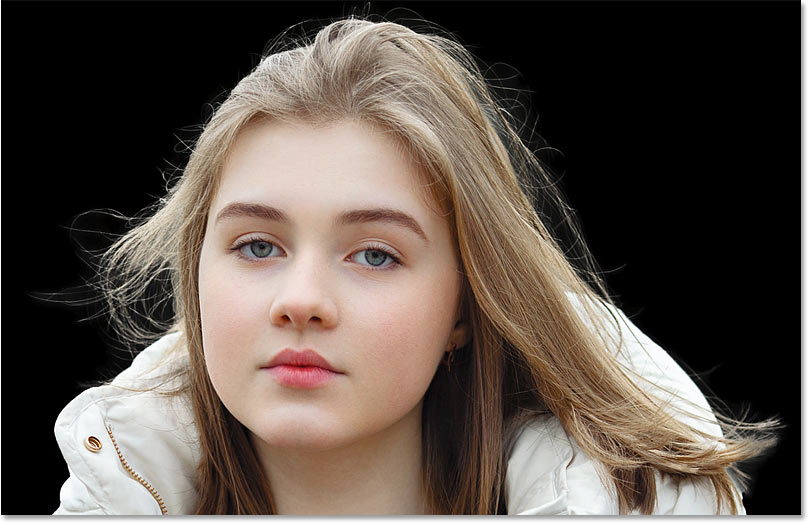
Compare that to the result from the Photoshop beta which had no trouble isolating her hair from the background, resulting in more hair being selected and giving it a much softer and more natural look.

And there we have it! Whatever magic Adobe’s Photoshop team is using has suddenly turned Select Subject and Remove Background into two of Photoshop’s most impressive features.
Let’s just hope that Adobe does not start charging credits to use them when the upgrade makes its way into the official Photoshop release, most likely later this year. For now though, you can use them as much as you want in the latest Photoshop beta.
Related tutorials:
- Using the Remove Tool with Generative AI
- Remove distracting people with AI in Camera Raw
- Place an image in a shape with the Frame Tool