
Place an Image in a Shape with the Frame Tool in Photoshop 2025
Photoshop's Frame Tool is the easiest way to place an image in a shape. And new in Photoshop 2025, the Frame Tool can use any of Photoshop's custom shapes! Learn how with this step-by-step tutorial.
Download the PDF: 2025 - Place an Image in a Shape with the Frame Tool
Photoshop’s Frame Tool was designed to be the easiest way to place an image into a shape. But until recently, the Frame Tool was limited to just rectangular or elliptical shapes.
Now in Photoshop 2025, the Frame Tool has been upgraded to include custom shapes, which means you can use any of the custom shapes included with Photoshop, or any custom shape you created yourself, and place your image into it using the Frame Tool.
I should mention that the Frame Tool is not Photoshop’s best way, or the most flexible way, to place an image into a shape. But it is the easiest way, especially if you are a Photoshop beginner. So here’s how it works.
Which Photoshop version do I need?
You'll need Photoshop 2025 to use the Frame Tool with custom shapes. Use the Creative Cloud Desktop app to make sure that your copy of Photoshop is up to date.
Let's get started!
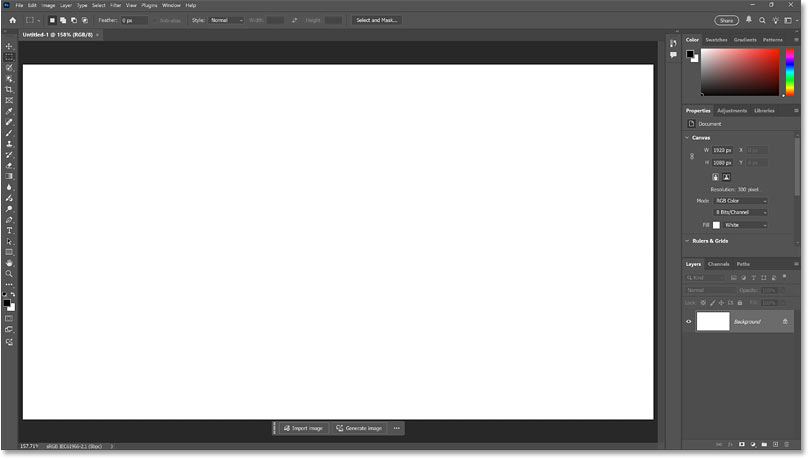
For this tutorial, I’ve gone ahead and created a new Photoshop document with a white background.
How to use Photoshop's Frame Tool
Here are the basic steps for placing an image in a shape using Photoshop's Frame Tool, regardless of which shape you're using. We'll look specifically at custom shapes once we've covered the basics.
Step 1: Select the Frame Tool
Start by selecting the Frame Tool from the toolbar.
By default it’s located directly below the Crop Tool.
Step 2: Choose a frame shape
In the Options Bar, choose a shape for your frame. As of Photoshop 2025, we can choose a rectangular shape, an elliptical shape, a triangle shape (new) or a custom shape (new).
To learn the basics of how the Frame Tool works, let’s keep things simple and choose the rectangular shape. But everything we cover here applies to the other shapes as well, including custom shapes. I’ll show you where to find all of Photoshop’s custom shapes later on.

Step 3: Drag out a frame
With the Frame Tool and your frame shape selected, click inside the document and drag out a frame.
As you drag, you’ll see only a rectangular bounding box for the frame, regardless of which frame shape you selected.

Release your mouse to complete the shape.
Since we chose the rectangle shape, we get a rectangular frame.

In the Layers panel, we have a new frame layer, which includes a frame thumbnail on the left and a thumbnail showing the contents of the frame to its right.
Notice that the frame itself is selected (the frame thumbnail has a white border around it). And currently the frame has no contents so we’re seeing the white background.

Step 4: Resize or reposition the frame if needed
To resize the frame, click and drag any of the transform handles (the little squares).

And to reposition the frame on the canvas, click and drag on the frame itself.
Here I’m centering the frame.

Step 5: Place your image into the frame
Now that we have a frame, how do we place an image inside it?
For that we use the Contextual Task Bar which should appear directly below the frame. If you’re not seeing the Task Bar, select it from the Window menu in the Menu Bar.
Placing an AI generated image into the frame
Adobe is all about AI these days, and if you don’t have an image to place into the frame, you can click Generate image in the Task Bar to create an image using Adobe Firefly.

The Generate Image dialog box opens where you can enter a prompt, choose whether you want an artistic (Art) or photorealistic (Photo) image, add effects, and choose an image to use as a style reference.
Since this is not a tutorial on how to generate images in Photoshop (I have a separate tutorial for that), I’ll quickly choose one of the prompt inspiration
thumbnails on the right to load its prompt and settings.
Then I’ll click Generate.

After a few seconds, Photoshop fills the frame with an AI generated image.

In most cases though, you’ll have your own image that you want to place into the frame.
So I’ll undo that to remove the AI image and return to the blank frame.

Placing your own image into the frame
To place your own image into the frame, click Import image in the task bar.

Navigate to the image on your computer, click on it to select it and click the Place button.

Photoshop places the image into the frame and resizes the image to fit within the frame proportionally.

Step 6: Resize and reposition the image in the frame
In the Layers panel, the image now appears inside the contents thumbnail of the frame layer. Notice that the contents thumbnail is now selected (it has a white border around it), which means that we can now reposition the image within the frame.
Also notice the smart object icon in the lower right of the content thumbnail. Photoshop automatically converts the image into a smart object when placing it into the frame. That means we can resize the image inside the frame as many times as needed without losing quality, and it makes it easy to replace the image with a different one, as we’ll see in a moment.

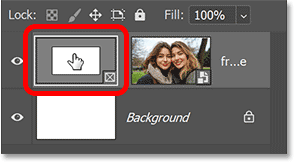
But before I do anything with the image, I’ll click on the frame thumbnail to select it.

With the frame thumbnail selected, the transform handles reappear around the frame so we can resize it independently of the image.
Here I’m making the frame smaller.

Then I’ll click on the contents thumbnail to select it so I can make adjustments to the image inside the frame.
I can then click and drag the image around inside the frame to reposition it, without moving the frame.
Here I’m dragging the image to the right.

What if we need to resize the image inside the frame?
In the Contextual Task Bar, click the Transform image icon. If you’re not seeing it, make sure you have the contents thumbnail selected on the frame layer, not the frame thumbnail. The task bar displays different options depending on which one is selected.
Clicking the Transform image icon places the Free Transform box and handles around the image. You can then drag the handles to resize the image inside the frame.
To resize the image proportionally, first go up to the Options Bar and make sure the link icon between the Width and Height fields is selected.
This will lock the aspect ratio of the image as you drag the handles to resize it.
To resize the image from its center, hold the Alt key on your keyboard (Windows) or the Option key (Mac) as you drag any of the handles.

And with Free Transform still active, you can click and drag on the image itself to reposition it within the frame.

Click Done in the task bar to accept it and close Free Transform.

If, after resizing the image, you change your mind and want to fit the image within the frame again, click the frame thumbnail in the Layers panel to make the frame active.

Then in the task bar, click the Fill Options icon.
Here you have three choices. Fill frame proportionally will reset the image size to fit it proportionally within the frame. Fit frame to content will resize the frame to fit the entire image inside it. And Center content in frame will keep the frame at its current size and center the image.

I’ll choose Fill Frame Proportionally so Photoshop resizes the image to fit within the frame.

How to replace the image inside the frame
Swapping the current image in the frame with a different image is easy.
First, make sure the frame thumbnail is selected in the Layers panel.
Then in the task bar, click the Replace image button.
You’ll see two options, Generate image and Import image. I’ll click Import image.

Navigate to the new image on your computer, click on it to select it and click Place.

And just like that, Photoshop swaps the old image for the new one and fits it proportionally within the frame.

Adding a stroke around the frame
One of the limitations of Photoshop’s Frame Tool is that it does not give us many options for adding effects. In fact, the only effect we can add is a stroke around the frame.
To add a stroke, make sure the frame thumbnail is selected in the Layers panel.
Then in the task bar, click the stroke color swatch.

Choose one of the preset stroke colors, or click the Custom Color icon in the upper right to open the Color Picker to choose your own color.
I like to choose a stroke color directly from the image. To do that, hover your mouse cursor over the image. The cursor will change to an eyedropper icon. Then click on a color to sample it.
Here I’m sampling a color from the woman’s jacket (lower right of the image).

Click OK to close the Color Picker. Then press Enter (Windows) or Return (Mac) to close the stroke color dialog.
Back in the task bar, set the stroke width. To make the stroke easy to see, I’ll go with a size of 20 pixels.

Then still in the task bar, click on the Stroke Alignment option (set to Center by default) and choose whether you want the stroke to appear inside the frame outline, centered on the outline or outside the outline.
I’ll choose Outside.

To hide the outline around the frame, select a different layer in the Layers panel.

And here’s my rectangular frame with the image inside it and the stroke around it.

And that’s the basics of how to use Photoshop’s Frame Tool to place an image into a shape.
So now let’s look specifically at using custom shapes, which is a new feature of the Frame Tool in Photoshop 2025.
How to load all of Photoshop’s custom shapes
As of Photoshop 2025, the Frame Tool can now place an image into any of Photoshop’s custom shapes. That includes the custom shapes that ship with Photoshop, along with any shapes you downloaded off the web, and any custom shapes you created yourself.
Photoshop has lots of built-in custom shapes to choose from, but only a few of them are loaded by default. To access the rest, we need to load them ourselves. Here’s how.
Step 1: Open the Shapes panel
Photoshop’s custom shapes are loaded from the Shapes panel. But the Shapes panel is not open by default.
To open it, go up to the Window menu and choose Shapes.

The Shapes panel opens with four groups of shapes (Wild Animals, Leaf Trees, Boats and Flowers).
You can twirl any of the groups open to view the shapes inside it. But there are lots more shapes available than what we see here.

Step 2: Load the Legacy Shapes and more
Click the Shapes panel menu icon in the upper right corner.
Then choose Legacy Shapes and More.

A new Legacy Shapes and More group appears.
Twirl it open to find two more groups, 2019 Shapes and All Legacy Default Shapes.
You can then twirl these groups open to access all of the shapes that were missing from the Shapes panel.

How to use a custom shape with the Frame Tool
Now that we have loaded all of Photoshop’s custom shapes, we can choose any of them to use with the Frame Tool.
With the Frame Tool active, click the Custom Shape icon in the Options Bar.
Then click the shape thumbnail to choose a shape.

Twirl open the groups and choose the shape you want for your frame.
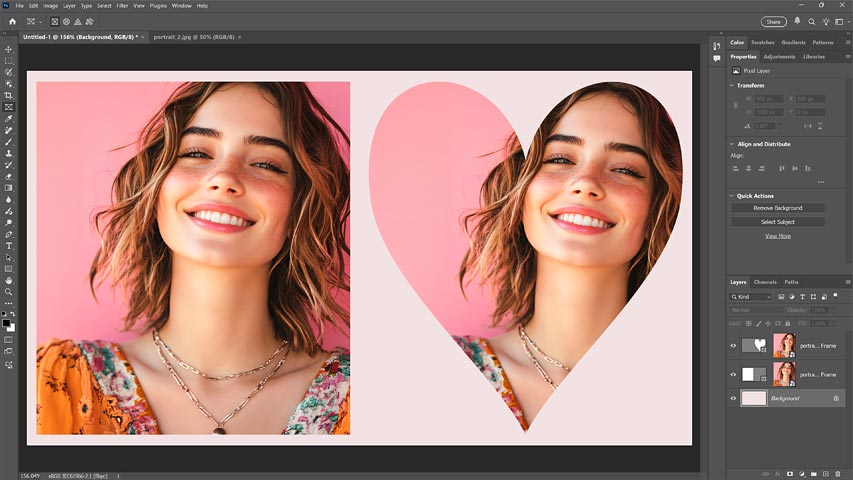
I’ll go to the Legacy Shapes and More group, then the All Legacy Default Shapes group, and I’ll twirl open the Legacy Default Shapes folder so I can choose a heart shape.
I’ll double-click on the heart shape to both select it and close the shape picker.

At this point, all of the steps for placing an image into the frame are exactly the same as what we covered earlier with the rectangular shape.
I’ll drag out my heart shape on the canvas, resize it with the transform handles and reposition it in the center.

Then I’ll click the Import image button in the Task Bar.

I’ll choose the image I want to use and click Place.

Photoshop places the image into the frame.

Finally, I’ll drag the image over to the right to reposition the woman inside the frame.

How to move the frame and the shape together
We’ve seen that we can move and resize the image inside the frame. But how do we move the image and the frame together?
To reposition both the frame and the image on the canvas, hold the Shift key on your keyboard and click on whichever thumbnail on the frame layer is not currently selected. This will select both the frame and the image together.
In my case, the content thumbnail is selected so with my Shift key held down, I’ll click on the frame thumbnail to select them both.

Then simply drag them into position. Here I’m dragging both the frame and the image over to the right.

And there we have it! That’s the basics of how to place an image into a shape using the upgraded Frame Tool in Photoshop 2025.
Related tutorials:
- New in Photoshop 2025: Using the Remove Tool with Generative AI
- New in Photoshop 2025: Remove Distracting People From Photos
- New in Photoshop 2025: Remove Wires and Cables From Photos