
Sunlight Through Trees Effect With Photoshop
Learn how to create the illusion of sunlight shining through trees with Photoshop. Then, finish off the effect by making it look like the sunbeams are shining on the ground below the trees!
This "sunlight through trees" effect can be a great way to enhance an outdoor photo. And as we'll see, creating it is a lot easier than you might think. We'll start by using Photoshop's color channels to help us select the sky behind the trees. Then, we'll use the Radial Blur filter to turn our selection into rays of sunlight. We'll brighten the sunlight using an Outer Glow layer style and then blend our sunbeams in with the image using the Soft Light blend mode.
To lengthen the sunbeams, we'll use Photoshop's Free Transform command, and we'll soften them using the Gaussian Blur filter. When we're done, we'll use a layer mask to hide the sunbeams in areas where we don't need them. There's quite a few steps involved in creating this effect, but as always, we'll take it one step at a time, explaining things as we go, so that even if you're new to Photoshop, you can easily follow along.
I'll be using Photoshop CC here but everything we'll be learning is fully compatible with Photoshop CS6. If you're using CS5 or earlier, you can still follow along here, or you can check out the original version of this tutorial.
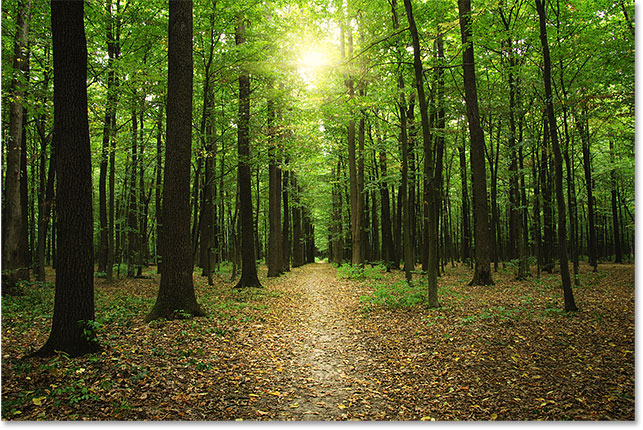
Here's the image I'll be using (forest sunlight photo from Adobe Stock):
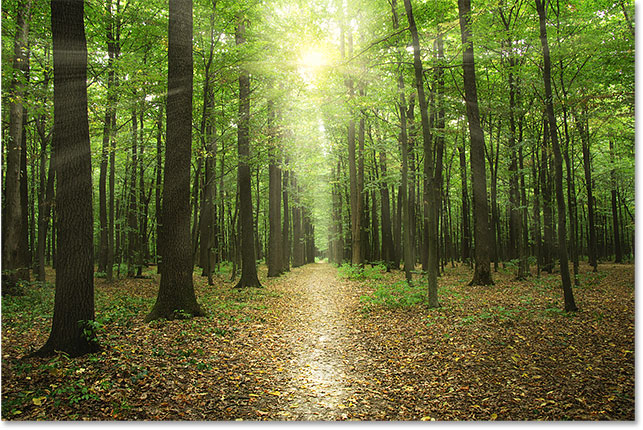
And here's what it will look like when we're done:
Step 1: Open The Channels Panel
With our image newly-opened in Photoshop, let's take a quick look in our Layers panel where we find the image sitting on the Background layer, currently the only layer in the document:

Every color we see in our image is made from some combination of three primary colors—red, green and blue—the primary colors of light. Photoshop represents these primary colors as color channels. There's a channel for red, a channel for green and, you guessed it, a channel for blue. Why are we talking about color channels? Well, we can use these color channels to help us create our rays of sunlight.
You'll find the three color channels in Photoshop's Channels panel, and you'll find the Channels panel nested in the same panel group as the Layers panel (as well as the Paths panel, which we won't be using here). By default, the Layers panel is the active panel in the group. To switch over to the Channels panel, click on its tab at the top of the group:

With the Channels panel open, you'll see the Red, Green and Blue channels, looking very much like layers in the Layers panel. You'll also see what looks like a fourth channel—RGB—at the top, but that one's not really a channel. "RGB" stands for "Red, Green and Blue", and it's simply the composite of the Red, Green and Blue channels. In other words, it's what we see as our full color image:

Step 2: Select The Channel With The Highest Contrast
Even though color channels represent the three primary colors of light, if you look at the preview thumbnails to the left of the channel names, you'll notice that each one is actually a grayscale image. And, each grayscale image is different from the others. We're going to use one of these grayscale images to help us select the sky behind the trees. What we need to do first is find the one that gives us the highest level of contrast.
To do that, simply click on each of the three channels. As you click on each channel, Photoshop will replace your full color image with a preview of what the grayscale image from that channel looks like. For example, I'll click on the Red channel to select it:

And here's the grayscale version from my Red channel. As far as contrast goes, it's not bad, but let's see if we can do better:

Remember what this first grayscale image looks like, then click on the Green channel:

This time, we get a different looking grayscale version. In fact, this one looks a lot like an infrared photo effect. The contrast is a little better than the Red channel, but still not as strong as I'm hoping for:

Again, remember what your Green channel looks like, then click on the Blue channel:

And here's my Blue channel's grayscale image. If you're working with a photo similar to mine, chances are the Blue channel will be the winner, with much stronger contrast than the other two. The sky in the background is nice and bright while the trees and the ground are very dark. This is exactly what we're looking for:

Step 3: Make A Copy Of The Channel
Now that we know which channel offers the highest contrast, we need to make a copy of it. In my case, the Blue channel is the one I want. To copy it, all I need to do is click on it and, with my mouse button held down, I'll drag the Blue channel onto the New Channel icon at the bottom of the Channels panel (second icon from the right):

When I release my mouse button, Photoshop makes a copy of the channel, names it "Blue copy" and places it below the other channels:

Step 4: Darken The Dark Areas Further With The Levels Command
Now that we've made a copy of the channel, we need to increase its contrast even more by darkening more of the image to pure black. We can do that using Photoshop's Levels image adjustment. Go up to the Image menu in the Menu Bar along the top of the screen, choose Adjustments, and then choose Levels:

This opens the Levels dialog box. If you look directly below the histogram (the black graph that looks like a mountain range) in the center, you'll see three little sliders. There's a black one on the left, a white one on the right, and a gray one in the middle. You can ignore the white and gray sliders. The only one we need is the black one on the left.
To darken the darkest areas in the image to pure black, click on the black slider and begin dragging it towards the right. Keep an eye on your image as you drag the slider and you'll see the dark areas becoming gradually darker. Continue dragging to the right until all the dark areas in the image appear solid black:

Click OK when you're done to close the Levels dialog box. Here's my image after dragging the slider. The trees and parts of the ground now appear filled with black while the sky in the background remains nice and bright:

Step 5: Select The Brush Tool
Even after darkening the image with the Levels adjustment, much of the ground in my image is still showing bright highlights. We need a way to darken the ground to pure black so that the only remaining bright areas are from the sky showing through the trees.
The easiest way to do that is to simply paint over the ground with black. For that, we'll need Photoshop's Brush Tool. I'll select it from the Toolbar along the left of the screen:

Step 6: Set Your Foreground Color To Black
Photoshop uses the current Foreground color as the brush color, so to paint with black, we'll need to set our Foreground color to black.
The fastest way to do that is by pressing the letter D on your keyboard to reset your Foreground and Background colors to their defaults. This will set your Foreground color to white and your Background color to black. Then, press the letter X on your keyboard to swap them, making black your Foreground color.
You can view your current Foreground and Background colors in the color swatches near the bottom of the Toolbar. The Foreground color swatch (in the upper left) should now be showing black:

Step 7: Paint Over The Ground
With the Brush Tool in hand, paint over the ground to fill it with black.
If you need to change your brush size, you can change it directly from the keyboard. Pressing the left bracket key ( [ ) repeatedly will make the brush smaller. Pressing the right bracket key ( ] ) repeatedly will make it larger. You can also adjust the hardness of the brush from the keyboard. Press and hold your Shift key while pressing the left bracket key to make the brush softer. Press and hold Shift while pressing the right bracket key to make the brush harder.
Here, I'm painting over the left side of the ground to completely cover it with black:

I'll continue painting over the right side, and here's my result. With the ground now filled with black, only the sky showing through the trees remains bright:

Step 8: Load The Channel As A Selection
Next, we need to load our channel as a selection. To do that, press and hold the Ctrl (Win) / Command (Mac) on your keyboard and click directly on the "Blue copy" channel:

Selection outlines will appear around the bright areas from the sky:

Step 9: Select The RGB Channel
Before we do anything else, let's bring back the full color version of our image. We can do that by clicking the RGB channel at the top of the Channels panel:

As soon as we select the RGB channel, our full color version returns. Notice that the sky showing through the trees is still selected:

Step 10: Switch Back To The Layers Panel
We're done working in the Channels panel, so let's switch back over to the Layers panel by clicking its tab at the top of the panel group:

Step 11: Add A New Blank Layer
We want to place our sunbeams on their own layer to keep them separate from the original image, which means we need to add a new blank layer to the document. To add one, click the New Layer icon at the bottom of the Layers panel:

Photoshop adds a new blank layer named "Layer 1" above the Background layer:

Step 12: Fill The Selection With White
Now that we're working on a new layer, we need to fill our selection with white. For that, we'll use Photoshop's Fill command. Go up to the Edit menu at the top of the screen and choose Fill:

This opens the Fill dialog box. Change the Contents option at the top to White (if you're using Photoshop CS6 or earlier, change the Use option to White). Make sure the other two options are set to their defaults (Mode should be set to Normal and Opacity should be at 100%):

Click OK to close out of the Fill dialog box. Our selection of the sky is now filled with white:

Step 13: Deselect The Selection
We don't need our selection outlines anymore, so let's remove them by going up to the Select menu at the top of the screen and choosing Deselect. This will clear the selection outlines from the image:

Step 14: Make A Copy Of Layer 1
Next, we need to make a copy of Layer 1. To do that, click on Layer 1 in the Layers panel, keep your mouse button held down, and drag the layer down onto the New Layer icon:

When you release your mouse button, Photoshop makes a copy of the layer, names it "Layer 1 copy" and places it above the original:

Step 15: Rename The Top Two Layers
Let's give our top two layers more useful names, ones that better describe what the layers are being used for (and so I don't have to keep referring to the top layer as "Layer 1 copy"). First, double-click on the name "Layer 1 copy" to highlight it:

This is the layer we'll be using to create the sunbeams, so let's name it "Sunbeams". Press Enter (Win) / Return (Mac) on your keyboard to accept the name change:

Next, double-click on "Layer 1" to highlight it:

We'll be using this layer to add reflections on the ground from the sunbeams, so we'll name this layer "Reflections". Again, press Enter (Win) / Return (Mac) to accept the name change:

Step 16: Turn Off The "Reflections" Layer
We won't be needing the "Reflections" layer until after we've created our sunbeams. So to keep it from adding extra brightness to the image, let's turn it off for now by clicking on its visibility icon:
Step 17: Convert The "Sunbeams" Layer Into A Smart Object
In a moment, we're going to create our sunbeams using Photoshop's Radial Blur filter. But the problem with the Radial Blur filter is that it can be tough to get things looking exactly right on the first try.
To make things easier for us, let's apply the Radial Blur filter as a Smart Filter, which will keep the filter settings editable even after we've applied it. To do that, we first need to convert the "Sunbeams" layer into a Smart Object. Right-click (Win) / Control-click (Mac) on the "Sunbeams" layer in the Layers panel. Make sure you click on an empty gray area, not on the thumbnail:

Choose Convert to Smart Object from the menu that appears:

It won't seem like anything has happened, but if we look at the layer's preview thumbnail in the Layers panel, we see a small Smart Object icon in the lower right corner. This tells us that the layer is now a Smart Object:
Step 18: Apply The Radial Blur Filter
Now that we've converted the layer into a Smart Object, let's select the Radial Blur filter by going up to the Filter menu at the top of the screen, choosing Blur, and then choosing Radial Blur:

This opens the Radial Blur dialog box. First, drag the Amount slider all the way to the right to set its value to 100, which will give us the longest possible sunbeams. Then, set the Blur Method to Zoom and the Quality to Best:

That part was easy. Now, here's the tricky part. In the lower right corner, you'll find the Blur Center box. This is where we tell Photoshop where we want the sunbeams to start from. In other words, where the sun is located in the sky.
The square box represents your image. Of course, your image probably isn't square, so you'll need to kind of imagine that it is. What you want to do here is click on the spot in the center of the box and drag it to where the sunbeams should be coming from. In my case, since the sun in my image is up near the top and a little to the left, I'll drag the center spot into that location:

Click OK to accept your settings and close out of the dialog box. Depending on the size of your image and the speed of your computer, it may take a few moments for Photoshop to finish applying the filter. When it's done, you'll have your first batch of sunbeams. They're a little faint at the moment, but we'll fix that next:

If you didn't get the center point for the sunbeams exactly right, don't worry. You can easily go back and edit your settings. If we look below the "Sunbeams" layer in the Layers panel, we see the Radial Blur filter listed as a Smart Filter.
Double-click on the words "Radial Blur" to re-open its dialog box, then reposition your Blur Center point. Click OK to accept the change and Photoshop will recreate your sunbeams. You can do this as many times as needed until you get things looking just right:

Step 19: Add An "Outer Glow" Layer Style
To make the sunbeams stand out more, we'll add an outer glow to them. Click the Layer Styles icon (the fx icon) at the bottom of the Layers panel:
Then choose Outer Glow from the list that appears:

This opens Photoshop's Layer Style dialog box set to the Outer Glow options in the middle column. There's only two settings we need to change here. First, increase the Opacity at the top to around 75% so the glow is more visible. Then, to change the glow's color, click on the color swatch:

Clicking the color swatch opens the Color Picker. In Photoshop CS6 and earlier, the default color for the Outer Glow was yellow, but in CC, Adobe changed it to white. Let's change it back to yellow. To use the same shadow of yellow as before, look down near the bottom center of the dialog box and you'll find the R, G and B (Red, Green and Blue) options. Set the R value to 255, the G value also to 255, and the B value to 190:

Click OK to close out of the Color Picker. Then, click OK to close the Layer Style dialog box. Looking back at our image, we see that the Outer Glow has been applied to the sunbeams, helping them stand out much better:

Step 20: Change The Layer Blend Mode To "Soft Light"
At this point, the sunbeams are a little too intense, so let's blend them in a bit more with the image. We can do that by changing the layer blend mode.
You'll find the Blend Mode option in the upper left of the Layers panel. By default, it's set to Normal. Click on the word "Normal" and change the blend mode to Soft Light:

After changing the blend mode to Soft Light, the sunbeams look a little more natural:

Step 21: Duplicate The "Sunbeams" Smart Object
To enhance the sunbeams even further, let's make a copy of our "Sunbeams" Smart Object. This time, rather than dragging the Smart Object down onto the New Layer icon at the bottom of the Layers panel, we'll use a handy shortcut.
Just press Ctrl+J (Win) / Command+J (Mac) on your keyboard. Photoshop instantly makes a copy of the Smart Object, names it "Sunbeams copy", and places it above the original. Notice that its blend mode has automatically been set to Soft Light, which is what we want:

Step 22: Rasterize The Smart Object
Notice also that the Radial Blur Smart Filter has been copied along with the Smart Object itself. We don't need to worry about changing our Radial Blur settings at this point, and in fact, the Smart Filter is just going to get in the way of our next step. So let's simplify things by converting the "Sunbeams copy" Smart Object into a normal layer.
To do that, right-click (Win) / Control-click (Mac) on the "Sunbeams copy" Smart Object. Remember, click on a gray area, not on the thumbnail:

Then choose Rasterize Layer from the menu. The term rasterize means "convert to pixels", which is what a normal layer is made of:
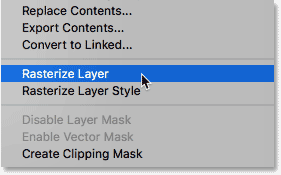
Again, it won't look like anything has happened to the image itself. But in the Layers panel, we see that the "Sunbeams copy" layer no longer shows a Smart Object icon in its thumbnail, which tells us that it's now just a normal, pixel-based layer. And, its Radial Blur Smart Filter is gone. The blur effect has been rasterized into the layer as well:

Step 23: Lengthen The Sunbeams With "Free Transform"
We now have two copies of our sunbeams; one on the "Sunbeams" Smart Object and one on the "Sunbeams copy" layer above it. Let's make the sunbeams on the "Sunbeams copy" layer even longer to add some variety. We can do that using Photoshop's Free Transform command.
Go up to the Edit menu at the top of the screen and choose Free Transform:

This places the Free Transform box and handles around the image. If you look closely in the center of the Free Transform box, you'll see a little target icon. This target icon represents the center point of the transformation.
What we need to do is move that target icon into the same spot that the sunbeams are zooming out from. To do that, click on the target icon, keep your mouse button held down, and drag it into position. Here, I'm dragging it into the center of the sun. If this were the actual sun, the target symbol would now be vaporized, and me along with it. Luckily, it's just a photo, so we're good:

If you notice the sunbeams themselves moving along with you as you drag, you're dragging the layer, not the target icon. In that case, release your mouse button and press Ctrl+Z (Win) / Command+Z (Mac) to undo your step. Then, try to click directly on the target icon itself and try again.
With the target symbol in place, we're going to drag the edges of the Free Transform box away from it to lengthen our sunbeams. But before we do, we'll need to give ourselves more room to work. Press and hold your Ctrl (Win) / Command (Mac) key on your keyboard and press the minus sign ( - ) a few times to zoom out until you have lots of empty space around the image:

Then, press and hold the Alt (Win) / Option (Mac) key on your keyboard, click on any of the corner handles (the little squares) and drag outward to stretch the sunbeams. Holding Alt (Win) / Option (Mac) as you drag tells Photoshop to use the target symbol as the center of the transformation.
If you want to keep the original aspect ratio of the image, press and hold your Shift key as well as you drag. However, you'll add more variety to the sunbeams if you stick with just the Alt (Win) / Option (Mac) key. Here, I'm dragging mainly downward to stretch the sunbeams closer to the ground:

When you're done, release your mouse button, then release the key(s). Make sure you release your mouse button first, then the key(s), or you'll get unexpected results. To accept the transformation and close out of Free Transform, press Enter (Win) / Return (Mac) on your keyboard.
Zoom back in on your image by pressing Ctrl+0 (Win) / Command+0 (Mac). This will instantly zoom the image to the Fit on Screen view. Here's my result after lengthening the sunbeams:

Step 24: Apply The Gaussian Blur Filter
Now that we've lengthened the sunbeams, let's add some blurring to them as well. With the "Sunbeams copy" layer still active in the Layers panel, go up to the Filter menu at the top of the screen, choose Blur, and then choose Gaussian Blur:

This opens the Gaussian Blur dialog box. At the bottom of the dialog box is the Radius slider which controls the amount of blurring. Keep an eye on your image as you begin dragging the slider to the right. The further you drag, the more blurring you'll apply to the sunbeams. I'm going to set my Radius value to around 20 pixels, but you may want to choose a different value depending on the size of your image:

Click OK to close out of the dialog box, and here's my result:

Step 25: Place The Sunbeam Layers Into A Layer Group
We're almost done. But one problem I have with my effect is that the sun is now looking so bright, instead of shining through the trees, it almost looks like it's in front of them. I want to keep my sunbeams at their current brightness, but I want to return the sun itself to its original brightness.
To do that, I'm going to place my "Sunbeams" Smart Object and my "Sunbeams copy" layer into a layer group. I'll need to have both of them selected, so since I already have the "Sunbeams copy" layer selected in the Layers panel, I'll press and hold my Shift key and I'll click on the "Sunbeams" Smart Object below it. This selects both of them at once:

To place them inside a layer group, I'll click on the menu icon in the upper right of the Layers panel:
Then I'll choose New Group from Layers from the menu:

This opens the New Group from Layers dialog box where we can name the group before it's added. I'll name the group "Sunbeams":

I'll click OK to close out of the dialog box, and if we look in the Layers panel, we see that both the "Sunbeams" Smart Object and the "Sunbeams copy" layer are now nested inside my new "Sunbeams" group. You can twirl the group open or closed by clicking the little arrow to the left of the folder icon. I'll leave mine closed to save space:

Step 26: Add A Layer Mask
To restore the sun to its original brightness, I'll add a layer mask to the group by clicking the Layer Mask icon at the bottom of the Layers panel:
A white-filled layer mask thumbnail appears on the group:

You can learn all about layer masks in our Understanding Photoshop Layer Masks tutorial. But in short, white areas on the mask represent areas where the contents of the layer group are fully visible in the document. Black areas represent parts where the contents of the group are hidden. At the moment, the entire mask is filled with white, so everything inside the group is visible.
To hide the sunbeam effect from in front of the sun, I need to paint over the sun with black. To do that, I'll once again select the Brush Tool from the Toolbar:

I'll make sure my Foreground color is still set to black:

Then, I'll position my brush cursor over the sun. I'll resize it using the left and right bracket keys ( [ and ] ) so that it's roughly the same size as the glow around the sun. I'll also make sure that my brush edge is nice and soft by pressing and holding my Shift key and pressing the left bracket key ( [ ) a few times:

Then, I'll simply click a couple of times on that spot to paint over it with black. Since I'm painting on a layer mask, not on an actual layer, we don't see the black color of the brush. Instead, the black is hiding the "Sunbeams" layer group in that spot, allowing the sun from the original image on the Background layer to show through:

Step 27: Select And Turn On The "Reflections" Layer
At this point, we're done with the sunbeams, so let's finish off the effect by making it look like the sunbeams are reflecting on the ground. For that, we'll need our "Reflections" layer. Click on it to select it:

Then, click on its visibility icon to turn the "Reflections" layer back on in the document:

Step 28: Flip And Resize The Layer With Free Transform
Go back up to the Edit menu and once again choose Free Transform:

When the Free Transform box appears around the image, right-click (Win) / Control-click (Mac) anywhere inside the box and choose Flip Vertical from the bottom of the menu:

This flips the layer vertically so that the white-filled areas from the sky now appear over the ground:

Next, click on the top Free Transform handle and drag it downward to resize the "Reflections" layer until all of the remaining white-filled areas are pushed below the sky and over the ground:

Finally, to blend the white areas in with the ground, change the blend mode of the layer from Normal to Overlay:

Before And After
And with that, we're done! To view your original image for comparison, press and hold your Alt (Win) / Option (Mac) key and click on the Background layer's visibility icon in the Layers panel:
This temporarily turns off every layer except the Background layer, allowing you to see your original image:

To turn the sunbeam effect back on, once again press and hold Alt (Win) / Option (Mac) and click the Background layer's visibility icon. This turns all the layers back on, and here, after changing the blend mode of the "Reflections" layer to Overlay, is my final result:

And there we have it! That's how to create sunlight shining through trees with Photoshop! Looking for a similar tutorial? Learn how to add rays of light to a sunset with Photoshop. Or check out our Photo Effects section for more Photoshop effects tutorials!