
How To Enhance A Sunset Photo With Photoshop
Tired of the colors in your sunset photos looking dull and lifeless? Learn how to enhance and restore those warm, golden hues with Photoshop using a simple Gradient Map adjustment and a layer blend mode. For Photoshop CC and CS6.
Sunsets are one of the most widely-photographed aspects of nature. Yet our photos rarely capture their intense beauty. A sky once filled with warm, golden hues often ends up looking cooler, less vibrant, and ultimately less interesting. In this Photoshop tutorial, we'll learn how to easily enhance our sunset photos and restore those warm reds, oranges and yellows. And we'll do it using nothing more than a simple Gradient Map adjustment layer and a layer blend mode!
This version of our Warm, Golden Sunsets tutorial has been updated for Photoshop CC and is fully compatible with Photoshop CS6. If you're using CS5 or earlier, you'll want to follow along with the original version.
Here's the photo I'll be using. I shot this one on a summer evening at the beach. I like the image overall, with the sun setting across the water. But those rich, vibrant colors I remember are looking muted and dull:

Here's the same image after warming it up and enhancing the colors. As always, I'll be covering each step along the way so you can easily follow along with your own image:

Let's get started!
How To Create Warm Golden Sunsets In Photoshop
Step 1: Add A Gradient Map Adjustment Layer
With our image newly-opened in Photoshop, we see the photo not only in the document window but also in the Layers panel. It's sitting on the Background layer, currently the only layer in the document:
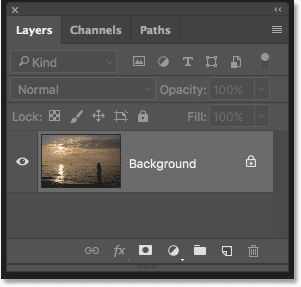
To enhance the colors in the sunset, we'll use a Gradient Map image adjustment. But applying the adjustment directly to the image would make a permanent change to the original photo. To avoid making any permanent changes, we'll apply the Gradient Map as an adjustment layer. Click on the New Fill or Adjustment Layer icon at the bottom of the Layers panel:
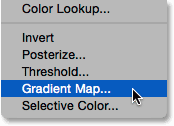
This opens a list of Photoshop's fill and adjustment layers. Choose Gradient Map from the list:
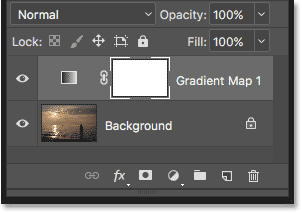
If we look again in the Layers panel, we see the new Gradient Map adjustment layer, named "Gradient Map 1", sitting above the image on the Background layer. Since the adjustment layer is separate from the image itself, nothing we do with the Gradient Map will be permanent. The original photo will always remain safe:
How A Gradient Map Adjustment Works
Photoshop's Gradient Map adjustment gets its name from what it does. It lets us map, or assign, different colors of a gradient to different tonal or brightness values in the image. For example, we can use a Gradient Map to assign one color to the darker areas (the shadows) and another color to the lighter areas (the highlights). Or we can take it a step further and map a third color to the midtones in between. In fact, if we wanted, we could map the entire tonal range of an image to a rainbow of colors! And since we're working with gradients, Photoshop creates smooth transitions between the colors we've chosen.
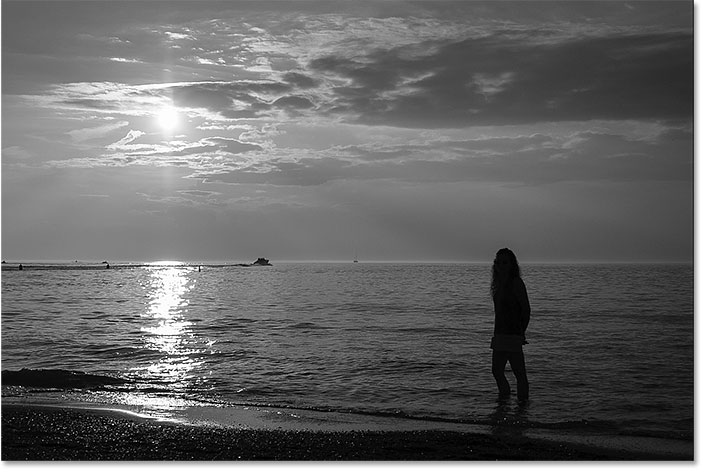
By default, the Gradient Map uses your current Foreground and Background colors as the colors for the gradient. If your Foreground and Background colors are set to their defaults, with your Foreground color being black and the Background color being white, you'll see your image temporarily mapped to black and white. This is pretty much the opposite of what we want for our sunset, so we'll see how to edit the gradient colors in a moment:
Step 2: Click On The Preview Bar To Edit The Gradient
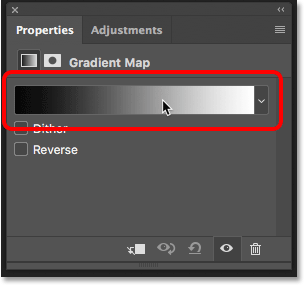
The options for the Gradient Map adjustment layer are found in Photoshop's Properties panel. The horizontal preview bar shows us the current gradient colors. To edit the colors, click on the preview bar:
Step 3: Change The Gradient Color On The Left To Red
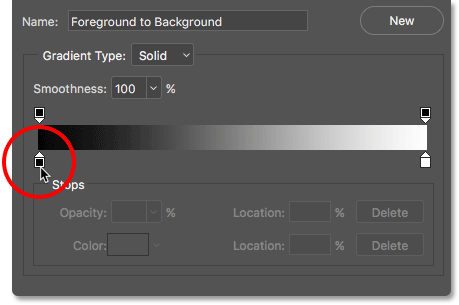
Clicking the preview bar opens the Gradient Editor. In the bottom half of the Gradient Editor is a larger gradient preview bar. Below each side of the preview bar is a little square with an arrow above it. These are called color stops. We use these color stops to edit the gradient colors. Let's start by editing the color on the left. This is the color that will be mapped to the darkest tones in the image. Double-click on the black color stop below the far left of the gradient:
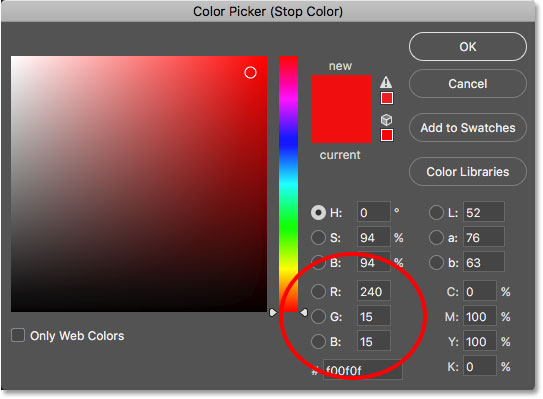
This opens Photoshop's Color Picker where we can select a different color. Choose a bright, saturated red. If you want to use the same shade of red that I'm using, look for the R, G and B values in the lower center of the Color Picker. "R" stands for Red, "G" is for Green, and "B" is for Blue. Set the R value to 240, the G value to 15 and the B value also to 15. Click OK when you're done to close out of the Color Picker:
We still have to change the color for the lightest tones, so don't close out of the Gradient Editor just yet. If we look at our image, we see the darker tones now appearing as various shades of red rather than black. You may think that bright red is an odd choice for the darkest tones in the image. But don't worry, it will darken up nicely when we change the blend mode of the Gradient Map adjustment layer in a few moments:

Step 4: Change The Gradient Color On The Right To Yellow
Next, let's change the color that's mapped to the lightest tones in the image. Still in the Gradient Editor, double-click on the white color stop below the right side of the gradient:
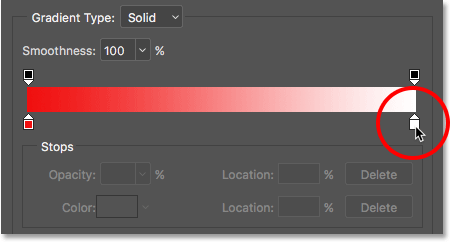
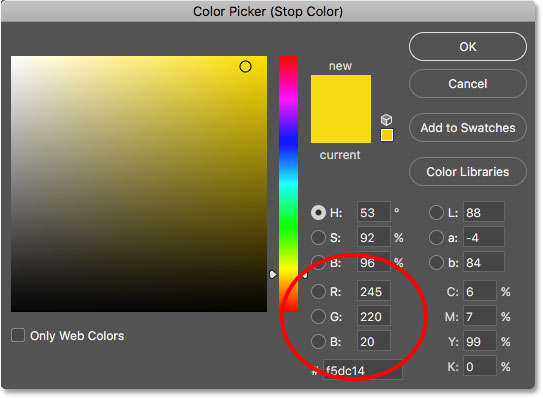
This once again opens the Color Picker. This time, choose a bright, saturated yellow. To use the same shade of yellow that I'm using, set the R value to 245, the G value to 220 and the B value to 10. Click OK when you're done to close out of the Color Picker:
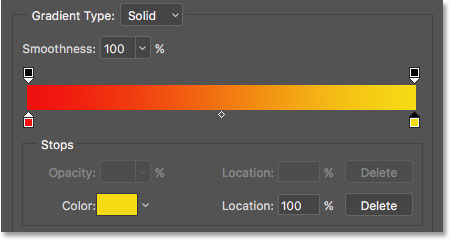
If we look in the preview bar of the Gradient Editor, we see that we now have a gradient that transitions from red on the left to yellow on the right. And, because Photoshop blends the two colors together, we also have a nice orange in the midtones:
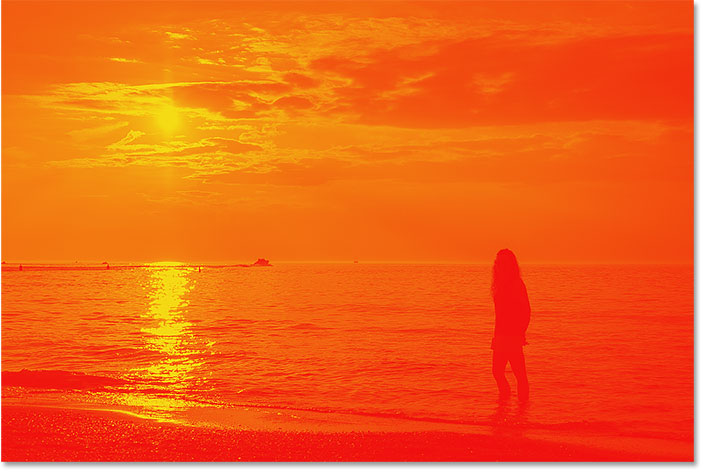
We're done editing the gradient, so click OK to close the Gradient Editor. Here's what my image looks like at this point, with the darkest tones mapped to red, the lightest tones mapped to yellow, and the midtones mapped to orange. Of course, the colors are not blending in with the photo the way they should be, so we'll fix that next:
Step 5: Change The Blend Mode Of The Gradient Map To Overlay
All we need to do now is blend the gradient colors in with the photo. We can do that by changing the blend mode of the Gradient Map adjustment layer. You'll find the Blend Mode option in the upper left of the Layers panel. By default, the blend mode is set to Normal. Click on the word "Normal" and change the blend mode to Overlay:
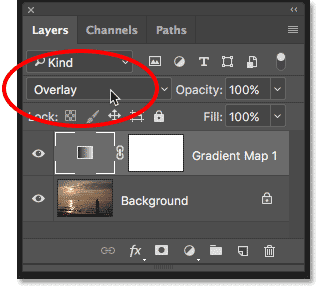
Photoshop's Overlay blend mode boosts the overall contrast in an image, making light areas lighter and dark areas darker. It also increases color saturation. After changing the blend mode to Overlay, the reds, oranges and yellows from our gradient now blend more naturally with the photo. The reds are now much darker, the yellows are much lighter, and a deep, saturated orange warms the areas in between:

Step 6: Lower The Opacity Of The Gradient Map Layer
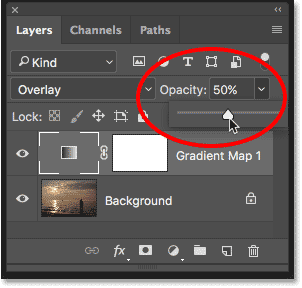
The only problem remaining is that the gradient colors are looking too intense. Let's reduce their intensity so that the photo looks more like a sunset and less like the end of the world. All we need to do is lower the opacity of the Gradient Map adjustment layer. You'll find the Opacity option in the upper right of the Layers panel, directly across from the Blend Mode option. Keep an eye on your image as you lower the opacity to find the setting that works best. I'll lower mine down to 50%:
Before And After
And with that, we're done! To compare the enhanced version of your sunset with the original photo, turn the Gradient Map adjustment layer off by clicking its visibility icon in the Layers panel:
With the adjustment layer off, the effects of the Gradient Map are hidden and the original photo reappears:

To view your enhanced version, turn the Gradient Map adjustment layer back on by clicking once again on its visibility icon (the empty box where the eyeball appeared). And here, after lowering the opacity to reduce the intensity of the colors, is my final "warm, golden sunset" result:

And there we have it! That's how to improve and enhance your sunset photos, restoring those warm, golden colors, using a simple Gradient Map adjustment layer and the Overlay blend mode in Photoshop! Check out our Photo Effects section for more Photoshop effects tutorials!