
Adding Focus To An Image With Color In Photoshop
In this Photoshop Effects tutorial, we're going to look at an effect that's very popular with sports and wedding photography, as well as in advertising. We're going to learn how to bring focus and attention to part of an image by making the rest of the image black and white while leaving the main subject in full color.
As we'll see, the flexibility of a Hue/Saturation adjustment layer not only makes this incredibly easy, it also gives us lots of freedom and control over the final effect, allowing us to colorize the image if we choose rather than leaving it black and white, and even enabling us to bring some of the photo's original color back in, all with very little effort.
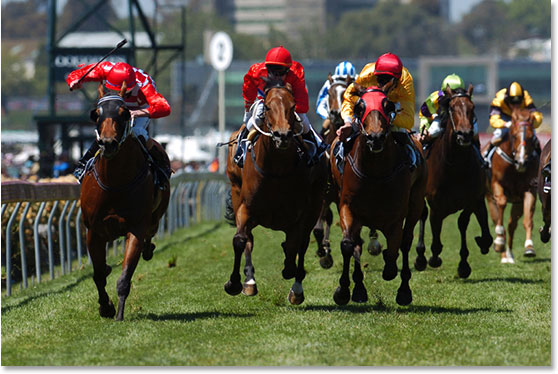
Here's the photo I'll be using for this tutorial:
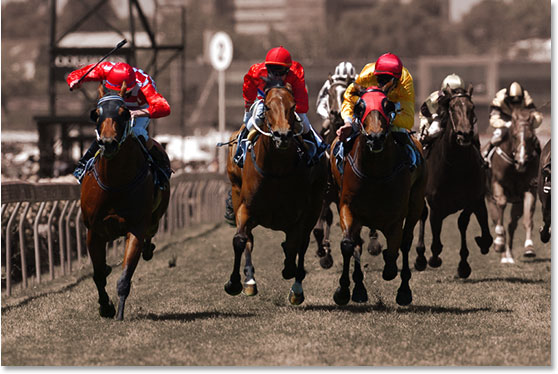
And here's the final effect we're after:
This tutorial is from our Photo Effects series. Let's get started!
Step 1: Select The Part Of The Image You Want To Have Remain In Color
With our image open in Photoshop, the first thing we need to do is decide which part of the image we want to have remain in full color. In my case, I want the three horses and their jockeys in the foreground to remain in color. The rest of the image will become black and white. Once you've decided which part of your image will remain in color, use whichever selection tool you prefer (Lasso tool, Pen Tool, etc.) to select it:

Step 2: Invert The Selection
We now have the area(s) of the image that will remain in color selected. Problem is, we actually want the exact opposite. We want all the areas we'll be removing the color from selected, not the areas where we're keeping the color. Fortunately, all we need to do is invert the selection, which will select everything that's not currently selected and deselect everything that is currently selected. To do that, you can either go up to the Select menu at the top of the screen and choose Inverse, or you can use the keyboard shortcut Shift+Ctrl+I (Win) / Shift+Command+I (Mac). Now all of the areas that will become black and white are selected, and the areas that will remain in color are not:

Step 3: Sample A Color To Use For Colorizing The Image (Optional)
We're going to be adding our Hue/Saturation adjustment layer in a moment, but before we do, if you want to colorize the image rather than turning it black and white, grab your Eyedropper tool from the Tools palette:

You can also press the letter I on your keyboard to quickly select it. We're going to sample a color from the image, and then we'll be using that color to colorize the image a bit later on. With the Eyedropper tool selected, click on a color in the image that you want to sample. I'm going to sample a brown color from the face of one of the horses:

Once you've sampled your color, you'll see that color now appearing as the Foreground color in the Tools palette:

Step 4: Add A Hue/Saturation Adjustment Layer
Now that we've sampled our color, we can add our Hue/Saturation adjustment layer. To do that, click on the New Adjustment Layer icon at the bottom of the Layers palette:
Then choose Hue/Saturation from the list of Adjustment Layers that appears:

One of the great things about adjustment layers is that each one comes with its own layer mask, which allows us to limit the effect of the adjustment layer to specific areas in the image. Since we had the area that we want to remove the color from selected when we added the Hue/Saturation adjustment layer, Photoshop will use that selection when creating the layer mask, as we can see if we look at the layer mask thumbnail in the Layers palette:

The area that was selected before I added the adjustment layer, which in my case was everything except the three horses and jockeys in the foreground of the image, appears as white in the layer mask, which means it will be affected by the adjustment. The horses and their jockeys, which were not selected, appear as black and will not be affected.
Step 5: Drag The Saturation Slider To The Left To Remove The Color
With the Hue/Saturation adjustment layer added, removing the color at this point is easy. Simply click on the Saturation slider in the Hue/Saturation dialog box and drag it all the way to the left. As you drag to the left, you'll see the color disappearing in the image, and dragging all the way to the left removes the color completely:

Your image should now look like this, with everything black and white except for the areas we initially selected where we wanted the color to remain:

If this was all you wanted to do with the image, you could end here, but on the next page, we're going to be using the color we sampled to tint the black and white areas, and we'll also be bringing some of the original color back in to complete the effect.
Step 6: Colorize The Black and White Areas (Optional)
If you'd prefer to add some color to the black and white areas rather than leaving them, well, black and white, all you need to do is click inside the checkbox to the left of the word Colorize in the bottom right corner of the Hue/Saturation dialog box:

When you check the "Colorize" option, Photoshop automatically uses your current Foreground color to colorize the image, and your current Foreground color is the color you sampled a few steps back. If you look at the Saturation value, you'll see that Photoshop has also reset it to 25 so that you can see the color in the image. If you want to reduce the intensity of the color, simply click once again on the Saturation slider and drag it to the left. The further you drag to the left, the less intense the color will appear. I'm going to reduce my Saturation value to around 20:

Here's my image after colorizing the black and white areas with my sampled color and then lowering the saturation:

Step 7: Change The Blend Mode Of The Adjustment Layer To Color (Optional)
If you want a slightly different colorizing effect, go up to the Blend Mode option in the top left corner of the Layers palette, click on the down-pointing arrow to the right of the word "Normal", and change the blend mode of the Hue/Saturation adjustment layer to Color:

Switch back and forth between the two blend modes and keep an eye on the colorized area of the image as you do. You'll see a difference in how light or dark the colorized area appears depending on which blend mode you have the adjustment layer set to. Choose the one you like best for your image. Here's a comparison of the two, with the "Normal" blend mode on the left of the image and the "Color" blend mode on the right. Notice how the left looks darker than the right:

I'm going to go with the "Color" blend mode with my image, since I think "Normal" makes it appear too dark.
Step 8: Bring Back Some Of The Original Color (Optional)
One final step you can do is to bring some of the original color back into the image, and once again it's very easy to do thanks to our adjustment layer. All you need to do is lower the opacity of the Hue/Saturation adjustment layer by going up to the Opacity option in the top right corner of the Layers palette, hovering your mouse over the word "Opacity", which turns your mouse cursor into the "scrubby slider" icon, and then clicking and dragging your mouse to the left. As you drag to the left, you'll reduce the opacity value, and if you keep an eye on your image as you drag, you'll see the original color beginning to appear in the colorized areas. I'm going to lower my opacity down to about 85% to bring back just a hint of the original color:

Once you've lowered the opacity and you're happy with the amount of color you've brought back into the image, you're done! Here, after lowering the opacity of my adjustment layer to bring back just a hint of my original color, is my final result:
And there we have it! That's how easy is to bring more focus and attention to part of your image with color thanks to the power and flexibility of our Hue/Saturation adjustment layer. Visit our Photo Effects section for more Photoshop effects tutorials!