
Simple Focused Lighting Effect In Photoshop
Download PDF: Simple Focused Lighting Effect
In this Photoshop tutorial, we're going to look at how to bring focus and attention to a specific part of an image using a simple and easy to create lighting effect. This technique also happens to be a good way to add interest to a photo that could use a little more visual snap.
Here's the image I'll be working with in this tutorial:
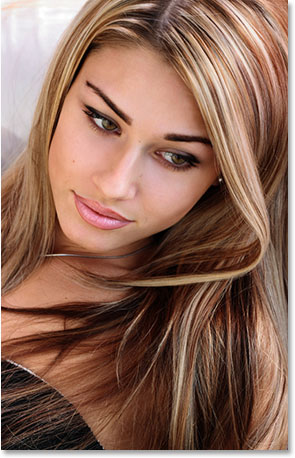
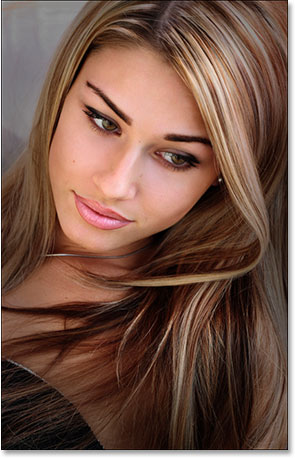
Obviously the woman in the photo is attractive, but the image itself could be more interesting. Let's bring more attention to her face by making a simple and subtle adjustment to the lighting in the image. Here's how it will look when we're done:
Step 1: Add A Curves Adjustment Layer
Let's begin by darkening the overall image using a Curves adjustment layer. First, we'll need to add the adjustment layer, so click on the New Adjustment Layer icon at the bottom of the Layers palette:
Then select Curves from the list of adjustment layers that appears:

Step 2: Drag The White Point Down To Darken The Image
When the Curves dialog box appears, you'll see a large square grid with a diagonal line running through it from the bottom left to the top right. We can control the tonal range of the image by reshaping this line. If you look on either end of the line, you'll see a small square point. The point in the bottom left represents areas of pure black in the image, and the point in the top right represents areas of pure white.
We can move these points around to control how light or dark the image appears. In our case, we want to darken the image, so click on the point in the top right corner of the grid, which controls how bright the image is, and drag it straight down. As you drag down, you'll see your image in the document window becoming increasingly darker. Continue dragging the point down until the Output option in the bottom left of the dialog box shows a value of around 70:

You can drag the white point down even further if you wish to make the image even darker, and in fact at this point, it's better to make the image too dark since we can easily lighten it later, as we'll see. I usually set my Output level to around 70 to begin with. Click OK when you're done to exit out of the dialog box. The photo now appears much darker than it was originally:

Step 3: Select The Lasso Tool
Now that we've darkened our image, we need to select the area where we want the light to appear. We don't need to worry about making precise, surgical selections, so Photoshop's Lasso Tool will work just fine. Grab the Lasso Tool from the Tools palette or press the letter L on your keyboard to select it with the shortcut:

Step 4: Draw A Selection Around The Area You Want To Highlight
With the Lasso Tool selected, draw a rough selection around the area you want to highlight. In my case, I want the light to fall on the woman's face, and maybe down on to her shoulder as well, so I'll draw out a selection like so:

Notice how my selection is rough and jagged looking, but that's okay. We'll be softening the edges of the selection in a moment.
Step 5: Fill The Selection With Black
If we look over in our Layers palette, we can see that we now have two layers. The Background layer, which is the layer that contains our photo, is on the bottom, and our Curves adjustment layer, which we used to darken the image, is sitting above it. One of the great things about Photoshop's adjustment layers is that each one comes with its own built in layer mask, and if we look closely, we can see a white highlight border around the layer mask's thumbnail:

This highlight border is telling us that we currently have the layer mask selected, and we're going to use the mask to hide the effects of the Curves adjustment layer inside the area we just selected. To do that, we need to fill our selection with black. Go up to the Edit menu at the top of the screen and choose Fill to bring up Photoshop's Fill dialog box. When the dialog box appears, select Black from the drop-down box to the right of the word "Use":

Click OK to exit out of the dialog box, and Photoshop fills our selection with black. We can see if we look again at our layer mask thumbnail in the Layers palette that it's now showing an area of black. This is the area that was inside our selection:

And if we look at our image in the document window, we can see that the darkening effect of the Curves adjustment layer has been hidden inside our selection, revealing the original photo underneath:

Press Ctrl+D (Win) / Command+D (Mac) to remove the selection outline from the image.
Step 6: Apply The Gaussian Blur Filter
To make the effect look more like light shining on the woman, we need to soften the edges of our selected area, which means we need to blur them, and for that, we can use Photoshop's Gaussian Blur filter. Go up to the Filter menu at the top of the screen, choose Blur, and then choose Gaussian Blur. When the dialog box appears, drag the slider at the bottom towards the right to increase the Radius value. The higher the Radius value, the more blurring is applied to the image. Keep an eye on your photo in the document window as you drag the slider to judge how much blurring you need to create a realistic looking, smooth transition between the light and dark areas. I'm going to set my Radius value to around 40 pixels. You may want to set yours higher or lower depending on your image. The best way to work is not to memorize numbers but to judge for yourself what value works best with your image:

Here's my image after applying the Gaussian Blur filter:

Step 7: Lower The Opacity Of The Curves Adjustment Layer (Optional)
If you find that the darkening effect of the Curves adjustment layer is too strong and making the rest of the photo around the highlighted area too dark, simply lower the opacity of the adjustment layer to fine-tune the effect. The Opacity option is in the top right corner of the Layers palette. I'm going to lower my opacity down to around 60%:

And with that, you're done! Here, for comparison, is my original image once again:
And here, after lowering the opacity of my adjustment layer to give me a much more subtle lighting effect, is my final result:
And there we have it! Visit our Photo Effects section for more Photoshop effects tutorials!