
Soft Focus Lens Effect With Photoshop
In a previous Photoshop effects tutorial, we looked at how to add a soft glow effect to a photo using a method that gave us the added bonus of increased image contrast and color saturation (see our Easy Soft Focus And Glow Effect tutorial for more information). What if you're already happy with the contrast and color saturation in your image and all you want is to recreate the sort of effect you could achieve with a soft focus camera lens or diffusion filter?
In this tutorial, we'll look at a fast and easy way to add a more traditional soft focus lens effect to an image. The nice thing about creating this effect in Photoshop rather than with an actual soft focus lens is that Photoshop gives us complete control over the final result.
Here's the photo I'll be using in this tutorial:

And here's how it will look with the soft focus effect applied:

Step 1: Duplicate The Background Layer
With our image newly opened in Photoshop, we can see in the Layers palette that we currently have one layer named Background. This layer contains our original image:

We need to make a copy of the Background layer. There's a few different ways to make a copy of a layer in Photoshop, but by far the fastest and easiest way is to use the keyboard shortcut Ctrl+J (Win) / Command+J (Mac). Photoshop creates a copy of the Background layer for us, names it "Layer 1", and places it directly above the original Background layer in the Layers palette:

Step 2: Apply The Gaussian Blur Filter To The New Layer
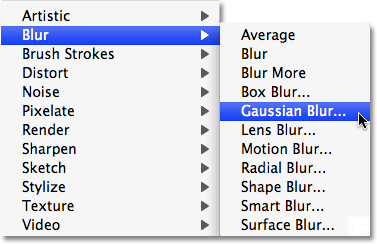
To create the soft focus effect, we need to blur the new layer. For that, we can use one of the most popular filters in all of Photoshop, Gaussian Blur. Make sure you have "Layer 1" selected in the Layers palette (selected layers are highlighted in blue), then go up to the Filter menu at the top of the screen, choose Blur, and then choose Gaussian Blur:
This brings up the Gaussian Blur dialog box. To control the amount of blurring that's applied to the layer, drag the Radius slider at the bottom of the dialog box while keeping an eye on your image in the document window. Dragging the Radius slider to the right will increase the amount of blurring, and dragging to the left decreases the amount of blurring. What you're trying to do here is blur the entire photo without blurring it to the point where you can no longer make anything out in the image. I'm going to set my Radius value to around 12 pixels, which works well for the image I'm using. Of course, each image is unique, and the Radius value you end up using may be different:

Click OK when you're done to apply the blurring to the layer and exit out of the Gaussian Blur dialog box. Here's my image after applying the Gaussian Blur filter:

Step 3: Lower The Opacity Of The Blurred Layer
At the moment, the blurring is much too intense. Instead of a soft focus effect, we've recreated how the world might look to someone who needs glasses. We need to reduce the amount of blurring and bring back some of the original image. To do that, all we need to do is lower the opacity value of the blurred layer. You'll find the Opacity option in the top right corner of the Layers palette. With "Layer 1" still selected, lower the opacity value of the layer down to somewhere between 50-60%. I'm going to lower mine to 50%:

The blurring is now more subtle:

Step 4: Add A Layer Mask
At this point, the basic soft focus effect is complete, but let's fine-tune things by bringing back a little more of the original detail to certain parts of the photo, specifically the two people's faces and the flower bouquet. Photoshop makes this easy to do thanks to layer masks. Be sure to check out our Understanding Layer Masks tutorial in the Photoshop Basics section for more information on how layer masks work.
First, let's add a layer mask. With "Layer 1" still selected, click on the Layer Mask icon at the bottom of the Layers palette:
Nothing will appear to have happened yet in the document window, but a layer mask thumbnail has now been added to "Layer 1" in the Layers palette:

Step 5: Select The Brush Tool
Select Photoshop's Brush Tool from the Tools palette, or simply press the letter B to access it with the keyboard shortcut:

Step 6: Lower The Opacity Of The Brush To Around 25%
We're going to paint with black on the layer mask to reduce the amount of blurring in certain areas, but we don't want to remove the blurring completely. We just want to reduce it, which means we'll need to lower the opacity of our brush. With the Brush Tool selected, the Options Bar at the top of the screen changes to show options specifically for the Brush Tool. One of those options is Opacity, similar to the opacity option we just looked at in the Layers palette except that in this case, we're affecting the brush opacity, not the layer opacity. Lower the brush opacity down to around 25%:

Step 7: Set Your Foreground Color To Black
We want to paint with black, which means we need to set our Foreground color to black. By default, whenever you have a layer mask selected, Photoshop sets the Foreground color to white, with black as the Background color. To swap them so black becomes the Foreground color, simply press the letter X on your keyboard. If we look at the Foreground and Background color swatches near the bottom of the Tools palette now, we can see that black is the Foreground color (the top left swatch):

Step 8: Paint Over The Areas Where You Want To Bring Back More Detail
With the Brush Tool selected, black as the Foreground color, and the brush opacity lowered to 25% or so, simply paint over any areas where you want to bring back more of the original image detail. You can change the size of your brush using the left and right bracket keys on your keyboard, which are located to the right of the letter P. The left bracket key makes the brush smaller, while the right bracket key makes it larger. You'll want to use a soft-edge brush, and you can control the edge hardness of the brush by holding down the Shift key and pressing the left and right bracket keys. Press Shift+left bracket a few times to make the edges softer, or Shift+right bracket a few times to make the edges harder.
I'm going to paint over the bride and groom's faces with my brush to bring back some detail. If, after painting over an area once, you find you could still bring back a bit more detail, simply release the mouse button, then click and paint over the same area again. You'll need to make sure you release your mouse button before you paint over the same area again, otherwise it won't work:

I'll paint a couple of times over the flower bouquet as well to bring back some detail, and I'll leave the rest of the image alone so that only the most important areas of the photo are in focus. Or at least, they're more in focus than anything else. If we look at the layer mask thumbnail again in the Layers palette, we can see the areas where I painted with black:

And with that, we're done! Here is my final "soft focus" effect result:
And there we have it! That's how to add a soft focus lens effect to an image with Photoshop! Visit our Photo Effects section for more Photoshop effects tutorials!