
Wrapping Text in 3D With Photoshop
In this Photoshop Text Effects tutorial, we're going to learn how to easily wrap text around a 3D object in Photoshop, without the need for any 3D software. We're going to be wrapping our text around a planet, but you can use this same basic technique to wrap text around just about anything. You'll need Photoshop CS or higher for this tutorial, since we'll be using Photoshop's "text on a path" feature, and then we'll be using Free Transform to reshape our text into a 3D perspective. Finally, we'll be using a layer mask to hide the text where it passes behind the object, giving us our final 3D effect.
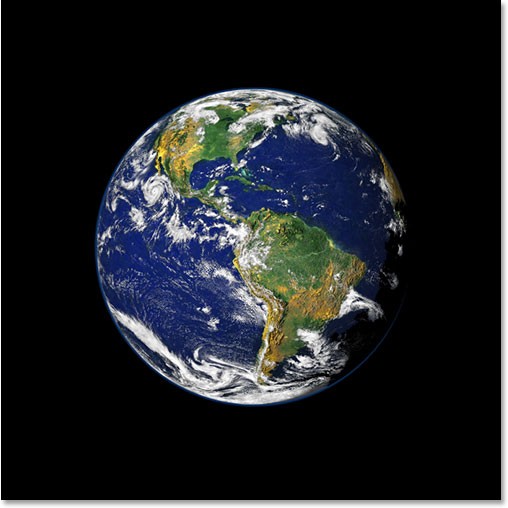
Here's the image of the planet (good old Planet Earth) I'll be wrapping the text around:
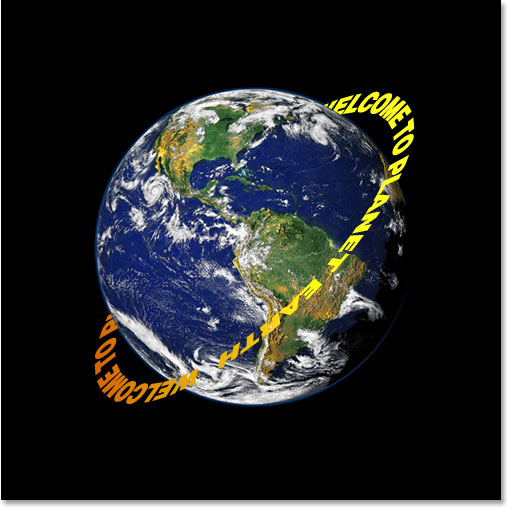
And here's what the image will look like after wrapping our 3D text around it:
Let's get started!
Step 1: Select The Elliptical Marquee Tool
The first thing I need to do for this effect is to drag out a circular selection around the planet, and for that, I'll use the tool that Photoshop includes for just such a task, the Elliptical Marquee Tool. Select it from the Tools palette. By default, it's hiding behind the Rectangular Marquee Tool, so you'll need to click on the Rectangular Marquee Tool and hold your mouse down for a second or two until the small fly out menu appears, and then select the Elliptical Marquee Tool from the list:

Step 2: Drag A Selection Around The Object, A Bit Larger Than The Object Itself
With my Elliptical Marquee Tool selected, I'm going to position my mouse as close to the center of the planet as possible to start with. Then I'm going to hold down my Shift key to constrain my selection to a perfect circle and I'm going to hold down my Alt (Win) / Option (Mac) key to tell Photoshop to use the point I'm about to click on as the center of my selection, so the selection extends out in all directions from that point. Then I'm simply going to click in the center of the planet and drag out a selection until my selection is a bit larger than the planet, giving my text room to wrap around it.
Chances are, the spot where I initially clicked my mouse was not the dead center of the planet, which means my selection will need to be repositioned. To move the selection around on the screen and reposition it as I'm dragging it out, I'll hold down my spacebar, which allows me to move the selection around wherever I want it, and then I'll release the spacebar to continue dragging the selection larger.
Continue dragging and repositioning the selection until it's properly aligned with the object and a bit larger than the object itself:

Step 3: Convert The Selection Into A Path
We now have our selection around the object, and we're going to use it to add our text to the image, using Photoshop's "text on a path" feature. Problem is, our selection is a selection, not a path. Fortunately, Photoshop makes it easy to convert any selection into a path. To do that, switch over to your Paths palette, which you'll find grouped in by default with the Layers and Channels palettes. The Paths palette will appear empty, since we currently don't have any paths in our document. To convert the selection into a path, click on the Make Work Path From Selection icon at the bottom of the Paths palette (it's the third icon from the right):

As soon as you click on the icon, Photoshop converts the selection into a path, and the new "Work Path" appears in the Paths palette:

And if we look back in our image, we can see that the dotted lines of our selection have been replaced with a thin solid line, which is our path:

We can now use this path, along with the "text on a path" feature in Photoshop CS and higher, to add our text, which we'll do next.
Step 4: Select The Type Tool
Switch back over to your Layers palette at this point. It's time to add our text. For that, we need to use Photoshop's Type Tool, so either select if from the Tools palette or press the letter T on your keyboard:

With the Type Tool selected, go up to the Options Bar at the top of the screen and select your font and font size. This 3D effect works best if you use a font with thick letters, so I'm going to choose Helvetica Black as my font. You can choose whichever font you like from the ones you have installed on your system, but again, try to pick one with nice thick letters, and also one that's easily readable. You'll need to experiment with the size of your font, since it will depend a lot on the size of the object you're wrapping your text around and even more so on the size and resolution of the image you're using. I'm using a 14pt font size for this tutorial, but again, you'll need to experiment on your own with your image:

Step 5: Choose A Color For Your Text
While you're up in the Options Bar, let's choose a color for our text. To do that, click on the color swatch:

This brings up Photoshop's Color Picker where you can choose whichever color you like for your text. I'm going to choose a bright yellowish-orange color, which should stand out nicely against the mostly blue planet as well as the black background:

Click OK once you've chosen your color to exit out of the dialog box.
Step 6: Type Your Text Along The Circular Path
With our font, font size and text color selected, we can add our text, and we want to add it so that it follows along the circular path we've created. To do that, move your mouse cursor over the part of the path where you want to begin typing. I'm going to start my text somewhere along the top of the path. As you move your mouse cursor over the path, you'll notice that the cursor changes from having a dotted square around it to a squiggly line running through it. That squiggly line tells you that you're about to type directly on the path and that your text will follow along the shape of the path, which is exactly what we want. To add your type, simply click on the path and begin typing. The effect will work best if you use all capital letters. I'm going to type "WELCOME TO PLANET EARTH":

Since I want my text to appear to fully wrap around the planet, I'm going to type the exact same sentence again at the end of it:

If you look closely, you can see that I've run into a small problem. There isn't enough space along my path to fit in all my text, and the word "EARTH" in the top left has been cut off. To fix that, I'm going to double-click directly on the type layer's thumbnail in the Layers palette, which is going to tell Photoshop to select all of my text at once:

My text will appear highlighted in white in my image. Then, with my text selected, I'm going to hold down my Alt (Win) / Option key and press the left arrow key on my keyboard a couple of times to close up the space between the letters until there's enough room to fit in all of my text and the word "EARTH" appears:

To space both sentences an equal distance apart and close up that large gap at the top, I'm going to click my mouse between the two sentences at the bottom (between the words "EARTH" and "WELCOME" ) and again holding down Alt (Win) / Option (Mac), I'm going to press my left bracket key a few times to add a little extra space between the two words until the text looks equally balanced all along the path.
When I'm happy with the spacing of my text, I'm going to press Ctrl+H (Win) / Command+H (Mac) to hide the path from view, leaving me with just my planet and my text circled and nicely spaced around it:

Our text is now circling around the planet but it looks very much two-dimensional and not very interesting. We're going to bring it into the third dimension next.
Step 7: Use Free Transform To Distort The Text Into A 3D Perspective
Now comes the fun part. We're going to convert our text into 3D! Or at least, we're going to create the illusion that it's 3D, anyway. Photoshop isn't a true 3D program, but we can still fake it. To do that, we'll use Photoshop's Free Transform command. With the type layer selected in the Layers palette, use the keyboard shortcut Ctrl+T (Win) / Command+T (Mac) to bring up the Free Transform handles around the text:

To bend my text into a 3D perspective, I'm going to hold down Ctrl+Alt (Win) / Command+Option (Mac) and then drag the Free Transform handle in the top right corner in towards the center of the planet. The further inward I drag, the more of a 3D perspective I create with my text:

When you're happy with the way your text looks, press Enter (Win) / Return (Mac) to accept the transformation:

Step 8: Add A Layer Mask To The Text Layer
Things are definitely starting to look more 3D, except for one minor detail. Our text isn't wrapping around the object, it's just sitting there in front of it. To really give us a 3D look, we need to hide the text in the areas where it's supposed to be behind the object, and we can do that using a layer mask. With the text layer still selected, click on the Layer Mask icon at the bottom of the Layers palette:

This adds a layer mask to the text layer, and it also adds a layer mask thumbnail in the Layers palette. We can tell that the layer mask is currently selected because the thumbnail has a white highlight border around it:

Step 9: Make A Selection Around Your Object
I want to hide the text that's supposed to be behind the planet, so I'm going to grab my Elliptical Marquee Tool once again and, just as I did at the beginning of this tutorial, I'm going to use it to drag out a selection around the planet. This time though, I want my selection to extend only to the edge of the planet, not an area around the outside of it like we did before. So once again, I'm going to click approximately in the center of the planet, and holding down Shift+Alt (Win) / Shift+Option (Mac), I'm going to drag out a circular selection around the planet. If I need to reposition my selection as I'm dragging, I'll again hold down my spacebar and move the selection around on the screen as needed, then I'll release the spacebar and continue dragging.
Here's my image with my planet selected:

Step 10: Paint With Black Inside The Selection To Hide The Text
With our layer mask added to the text layer and a selection around the planet, we can easily hide the text that's supposed to be behind the planet by simply painting over the text. First we need our brush, so select the Brush Tool from the Tools palette, or press B on your keyboard:

Then, with black as your Foreground color, simply paint over the text you want to hide. Since we're painting on the layer mask, not the layer itself, we won't be painting black on the image. Instead, anywhere where we paint with black will hide the contents of the layer. I need to hide the text in the top part of the planet, so I'll paint over it with my Brush Tool. Thanks to the selection I created, I don't have to worry about being sloppy with my brush and accidentally painting beyond the edge of the planet, since Photoshop will only allow me to paint inside the selection. Anywhere I paint outside of it is ignored:

Continue painting over the text until you've hidden everything that needs to be hidden. When you're done, press Ctrl+D (Win) / Command+D (Mac) to remove the selection. If your path under the text became visible again, press Ctrl+H (Win) / Command+H (Mac) to hide it from view.
Here's my image after painting over the text along the top to hide it, creating the illusion that the text is now circling the planet in 3D:

Step 11: Add A Gradient Overlay Layer Style
To finish things off, let's add a bit of lighting to our text using one of Photoshop's Layer Styles. Click on the Layer Styles icon at the bottom of the Layers palette:
Then select Gradient Overlay from the list:

This brings up the Layer Style dialog box set to the Gradient Overlay options in the middle column. By default, Photoshop gives us a black to white gradient, which is what we want. Rather than using the gradient to colorize our text though and make it black and white, we're going to use it to add a simple lighting effect. First, change the Blend Mode option at the top from "Normal" to Vivid Light by clicking on the down-pointing arrow to the right of the word "Normal" and selecting "Vivid Light" from the list. Then lower the Opacity value down to about 60%. Finally, change the Angle option at the bottom to 0°:

Click OK when you're done to exit out of the dialog box and apply the Gradient Overlay style to the text, and you're done! Here's the final effect with my simple lighting effect added to the text:
Where to go next...
And there we have it! Visit our Text Effects or Photo Effects sections for more Photoshop effects tutorials!